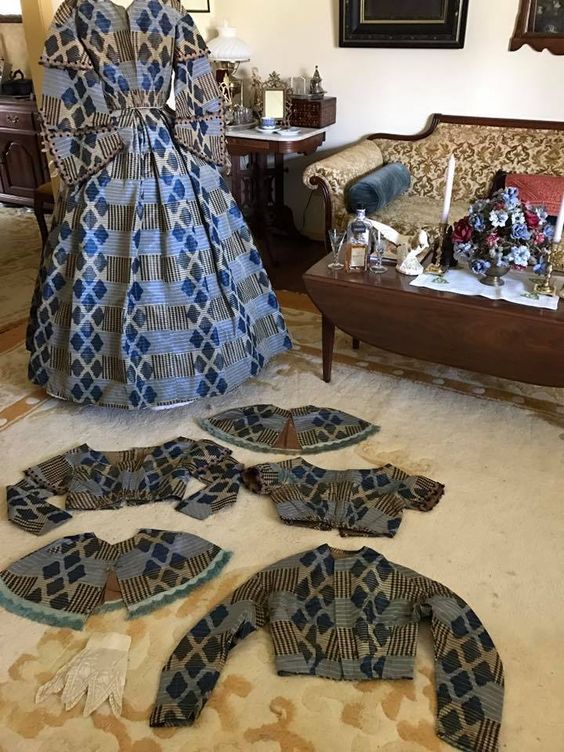
Monday, September 28, 2020

Fixing It - The Lilac and Chantilly Dress

This dress we've seen before on the blog in the following posts.

Day Bodice
Evening Bodice

But still, things needed to be done with it.  More with the day bodice than the evening one, but still, plenty of work to be done.

For the evening gown, just a few small tweaks were needed.  The hooks and eyes needed to be redone as they were too large and spaced out too much.  I also covered the edge of the Chantilly lace in a narrow velvet ribbon, after seeing the edges covered in original gowns.

Original from Time Traveler's Antiques.  This was the original design
inspiration for the Chantilly evening gown.  The lace covering appears
to be self fabric pleating.

From Ebay.  Looks to be covered with flat-applied velvet ribbon.

Augusta Auctions.  Lace is covered with a silk pleating.  It's the
same color as the dress fabric but appears to be different.

As far as the bows, I ended up replacing the self fabric ones with a silver silk satin ribbon.  You do see evening dresses trimmed with colors the same as the dress, and since this dress is a lilac shot with silver gown, I figured a silver ribbon would work.

Unknown fashion plate

La Moda Elegante Illustrada, 1865

I didn't add a big bow at the neckline (where the original inspiration has a large cluster of flowers) because I figured I could put a brooch there instead.  After making a pretty little tucker and attaching it, the evening bodice was done!  The tucker is a pleated one, based on several originals like this one:

Unknown collection.


No pictures of the back as I didn't have anyone to help me do the hooks and eyes therefore I am actually holding the bodice closed with one hand for the pictures!

Next up was the day bodice, which did need a fair bit of work.  The whole bodice front was taken apart so I could extend it 1" on either side to accommodate a larger bust than the last time I wore this gown.  Of course, this meant re doing the hooks and eyes and also cutting and making more piping.  I also took out the pagoda sleeves and recut silk lining instead of the polished cotton lining it had.  The lace had some breaks in it which had to be mended, then I used more velvet ribbon over the edge like the originals.

The last piece were the accessories.  I already had partially done open undersleeves for the dress, I just had to add a second tier of whitework edging to them.  I made a collar out of the same edging as well.  I also had a handkerchief edged in the same whitework but I had gathered the whitework so I took it out and applied it flat (except at the corners) to more closely mimic originals.

After attaching these pieces to the day bodice, my work was done!


Enjoy!


Monday, September 21, 2020

Another 1830s Cap

Yes, another one... mostly because I was bored and these things make up super quick-even by hand!

I used "The Workwoman's Guide" again, with figure 1 and 2 in plate 15.  Directions were found on page 121 of my copy.


The actual making of the cap wasn't too difficult-making the pattern on the other hand required some brain power.  Some of the measurements were missing from the directions and the plate was so small that it was hard to read the letters that were there.  Eventually, though, I got a working pattern piece.

I chose to cut my cap out of spotted muslin again.  I had plenty of fabric left and I like the effect it gives.  I won't say that spotted muslin caps are super popular-most of the originals I've seen are either plain cotton or plain cotton that has been embroidered, but originals do show up spotted.

Museum of Fine Arts, Boston

Museum of Fine Arts, Boston

Here's an original made with a very similar pattern to the young lady's cap from "The Workwoman's Guide".

Whitaker's Auctions (Tasha Tudor Collection)

I trimmed mine with lace and blue silk satin ribbon.  I was concerned at first with how tight across the head the cap seemed to be but once I put my hair in the right spot, it magically fit really well.  And it fits a lot more hair than it looks like it would!


Enjoy!

Monday, September 14, 2020

Pink Rose Headdress

In an effort to build up some of the lacking aspects of my wardrobe, I have embarked on making several evening headdresses-starting with this one meant to go with the cotton candy silk dress posted last week (although it will go with both my other 1850s dresses as well).  I based it off this painting from 1853:

Portrait of Mademoiselle Durand, 1853

Isn't she elegant?  I love the contrast between the light pink florals and her stark black gown.  It makes me think this headdress would work very well with the black silk evening bodice that is still to come-that is, if the headdress wouldn't be nearly 10 years out of date by the time the black dress would have been made!

My supplies included some millinery wire (unknown gauge; I've had this stuff for years.  It's mostly 18-22 gauge), 2 velvet rose sprays and 4 azalea bunches from Timely Tresses (all in pink), and some 1.5" black velvet ribbon and silk sleeves from the stash.

I first took a length of millinery wire and made a headband, 1.25" wide.  This was covered in velvet ribbon.  After that, it was time to arrange the flowers and hide the stems.  Then the whole thing was stitched up neatly and the basting stitches from earlier were taken out.  And now I have a nice little 1850s headdress!


Enjoy!

Sunday, September 6, 2020

Fixing It - The Cotton Candy Silk Taffeta

Back in the costume closet we go-this time to pull out what I affectionately refer to as the 'cotton candy' dress as it is blue and pink.

Well, actually, it's a mini stripe that is black and pink then shot with blue and then embroidered with black and blue dots, but I still call it the cotton candy dress.

This dress didn't need so much fixing as it did completing.  The skirt was done (and done well-watch pocket, skirt lifters, and everything) but the one time I wore it, I wore it with a black wool basque.  I was doing pre-hoop for that event, but the skirt can be worn with either a hoop or multitudes of petticoats.  I never got around to cutting or stitching the bodice until now.

I felt like I still had plenty of fabric to work with.  I knew I wanted a low body basque, with a pelerine and removable pagoda sleeves.  That would make the gown very versatile and appropriately 1850s.  I didn't have an exact original in mind at the time, just a general idea.  I wanted something that could serve me in a variety of different events and times of day.  Versatile looks were common in the 1850s!

Gown sold on Augsta Auctions.  This is the day look.

Same gown, with the lower sleeves and pelerine removed.  Cute evening look!
Collection of Heather Hook.  blue warp-printed silk dress with two day bodices,
two evening bodices, and two pelerines.

Musée Galliera de la Mode de la Ville de Paris, 1860s.  Evening/dinner look.

Same as above, with a pelerine.
Sold on Ebay.  I believe the lower sleeves are removable as well.

Villa Carlotta Museum.

Sold on Antique dress.  Evening look.

Same dress with pelerine added and lower sleeves removed.

Completely by accident, I came along the following gown while looking for something unrelated.

Metropolitan Museum of Art, 1856-1857
I liked the fringe, the basque, and the pelerine.  The design was decided.  It was then time to search for fringe-and a lot of it.

That was a bit more difficult than I thought at first.  Modern fringes do not mimic period trims well and finding old stock with enough yardage can be tough.  Generally I would fringe some of the fabric itself but with the little embroidered dots, I felt that fringing the fabric would be difficult.

I finally found a fringe that workable-with lots of yardage.  It probably isn't antique, but it is old stock.  In fact, the design on top of the fringe is remarkably similar to the original above.


The only thing I didn't quite care for was the super thick fringe-usually fringe was fine.  But with little searching, I did find a few examples of thicker fringe so I felt like my fringe would work.
Metropolitan Museum of Art, 1845
Out of curiosity, I did a burn test on the fringe.  It's most likely a silk/rayon blend.  It definitely smelled of burning hair which says silk but it burned more like rayon than silk itself.  It didn't melt.  With those results, I felt comfortable using the fringe on a period reconstruction.

Although it looks a little odd on the bodice to our eyes, the fringe is the exact shade of blue used in the shot silk.  I've seen several originals (particularly in the 1840s and early 1850s) that used the weft color (or what seems to be the weft color) as a trim or accessory color.  Here are a few examples:

Meg Andrews Auction Site

Unknown painting

Whitaker Auction
Unknown collection.  Brown/red shot with green
and trimmed with green velvet.

With trim picked out and on its way from France, it was time to cut all the pieces.  I did go with a low body and used an original 1850s Godey's pattern for the upper sleeves.  I then cut a pelerine (I tried doing a zig zag one like the original but my brain wasn't wanting to recreate those angles so I went with a plain one instead) and some lower sleeves.  I also cut a set of bretelles, or braces, for the evening bodice to spice it up a bit.  Then I got to sewing.

When the fringe came, I set all the trim on by hand.  I added a little black velvet ribbon to the bretelles to set them off where I didn't want fringe.  Then it was time to decide what to do with the waistline of the bretelles.  Original fashion plates show a variety of treatment-from being left plain to what look like little rosettes.

Unknown magazine, probably 1863-1865

Magasin des Demoiselles, 1856


Les Modes Parisiennes, 1854
 I made a simple pleated rosette for both the back and the front.  The bretelles were stitched together with the rosettes and the whole thing simply slips over my head.


The only other thing to do was to add the accessories.  I chose an already completed collar/undersleeves/handkerchief set made from vintage whitework.


Then a tucker needed to be made.  Since the upper sleeves for evening were so open, I also made some white silk taffeta puff undersleeves to wear.  These, along with the tucker, will be tucked in the dress's pocket until put to use.


The whole ensemble turned out lovely!


Enjoy!