Thursday, April 27, 2017

Rosette Buttons: A Tutorial

I'm a huge fan of buttons.  Unfortunately, the vast array of buttons originally available are no longer in existence.  Still, it is possible to find cards of original buttons on occasion.  I think they add so much to the look of a dress and most types, I believe, are under-represented in the hobby today.  Anna Worden Bauersmith has a nice little post on the The Sewing Academy about the buttons she found on period dresses.  Here are some of her findings on dresses:

Silk day dresses: Self-fabric, contrasting or coordinating fabric, velvet, glass, china, composite, gold and silver gilt, crochet, needlework, dorset, enameled, embroidered, and rosette.
Wool or cotton day dresses: Self-fabric, velvet, glass, china, vegetable ivory, gold gilt, mother of pearl, pearl, needlework
Sheer dresses: Glass, china, mother of pearl, crochet

Living historians as a whole, including myself, tend to go towards fabric covered buttons.  They're easy to make, and there is no supply and demand to worry about.  But look at all the other options we're missing!  Here are some of my favorite buttons on period dresses:


And I think my favorites have to be the snake buttons from this 1857 wedding dress:


A popular choice for silk dresses and wrappers were rosette buttons.  Plenty of living historians have embraced the rosette belt concept.  Directions can be found at The Sewing Academy.


Aside from rosettes for belts, there are lots of examples of women using rosettes as buttons or as trim on sleeves and skirts.  Here are a few:


With my latest dress, I found this inspiration:


Thread buttons with a rosette.  So pretty!  Now, for buttons like the original, you would need buttons with a single middle hole then wrap thread around them in stripes.  You could also use dorset buttons and wrap thread around them.  I used thread covered and did some embroidery around them.  I tried doing bullion knot like flowers as in this period button:


Well, it turns out my bullions are not quite up to par.  So I ended up doing a 6-pointed star of sorts with a twisted silk cord and then wound thread around the middles of the stars like a spider web (I always called it the spider stitch-not sure what the official name is).  It turned out something like this:


Then I put the rosette around it.  Here is my exact process.

You start off with a plain button and a circle of fabric that's bigger than the button.  I can't really explain how much bigger because it depends on the size of your button, but enough to cover the outside then enough to meet in the middle when folded down.  I'm not good at cutting circles so I did the best I could.


Then, I took my silk (since I had a shot silk and wanted to use the secondary color for the design) and fringed it, taking 6 strands of silk.


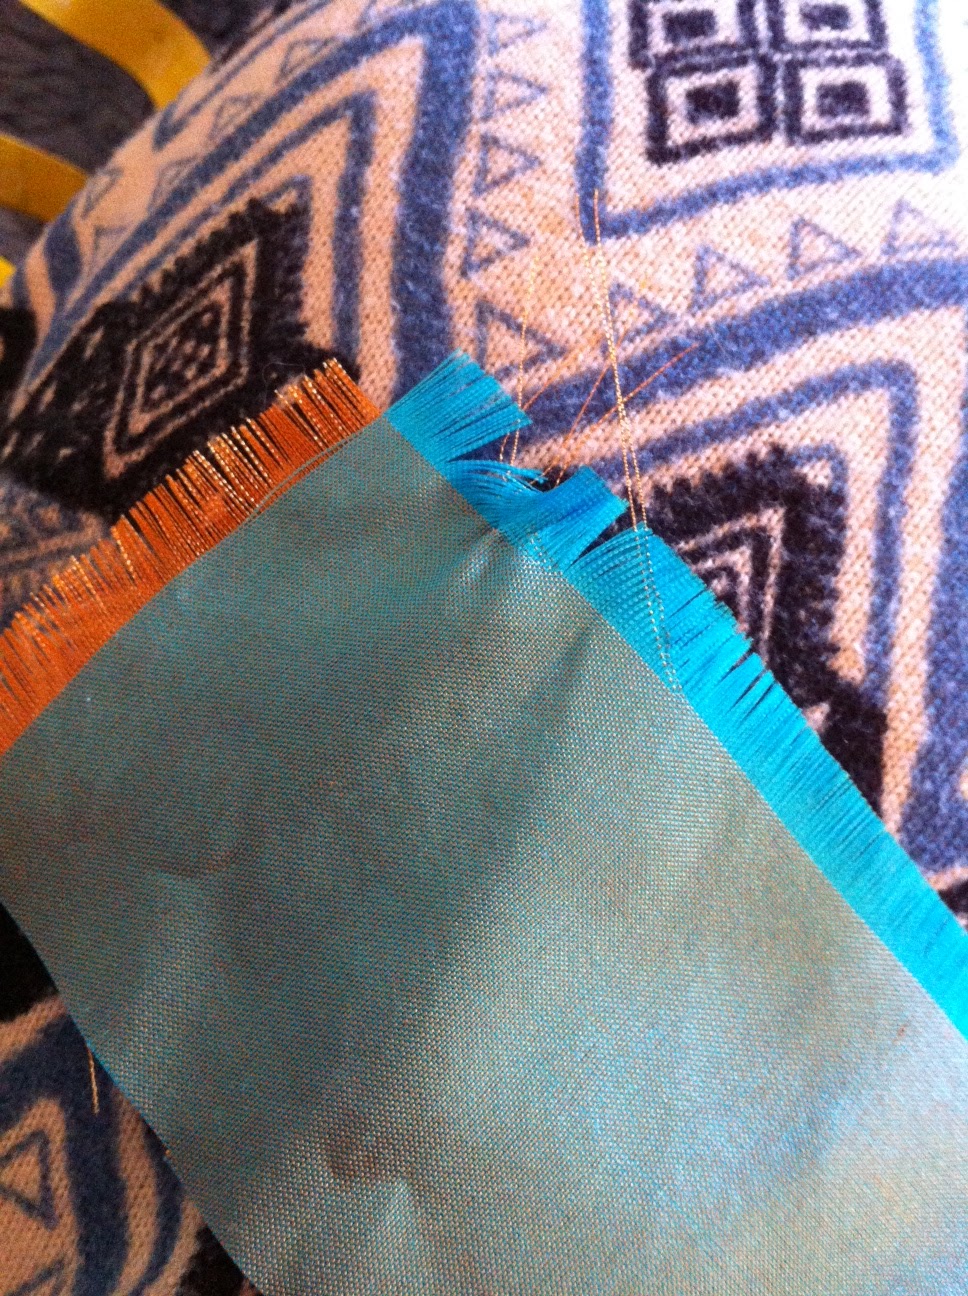
I used these as embroidery floss and made a French knot in the middle of the fabric circle.  Then I sewed basting stitches around the circumference of the circle.  I put the button in the middle of the circle and pulled on the basting stitches.  Then all you have to do is secure it and you have a covered button (with a knot in the middle).


I took 6 strands of my orange 'floss', twisted them together, then folded them in half to make a large silk twist.


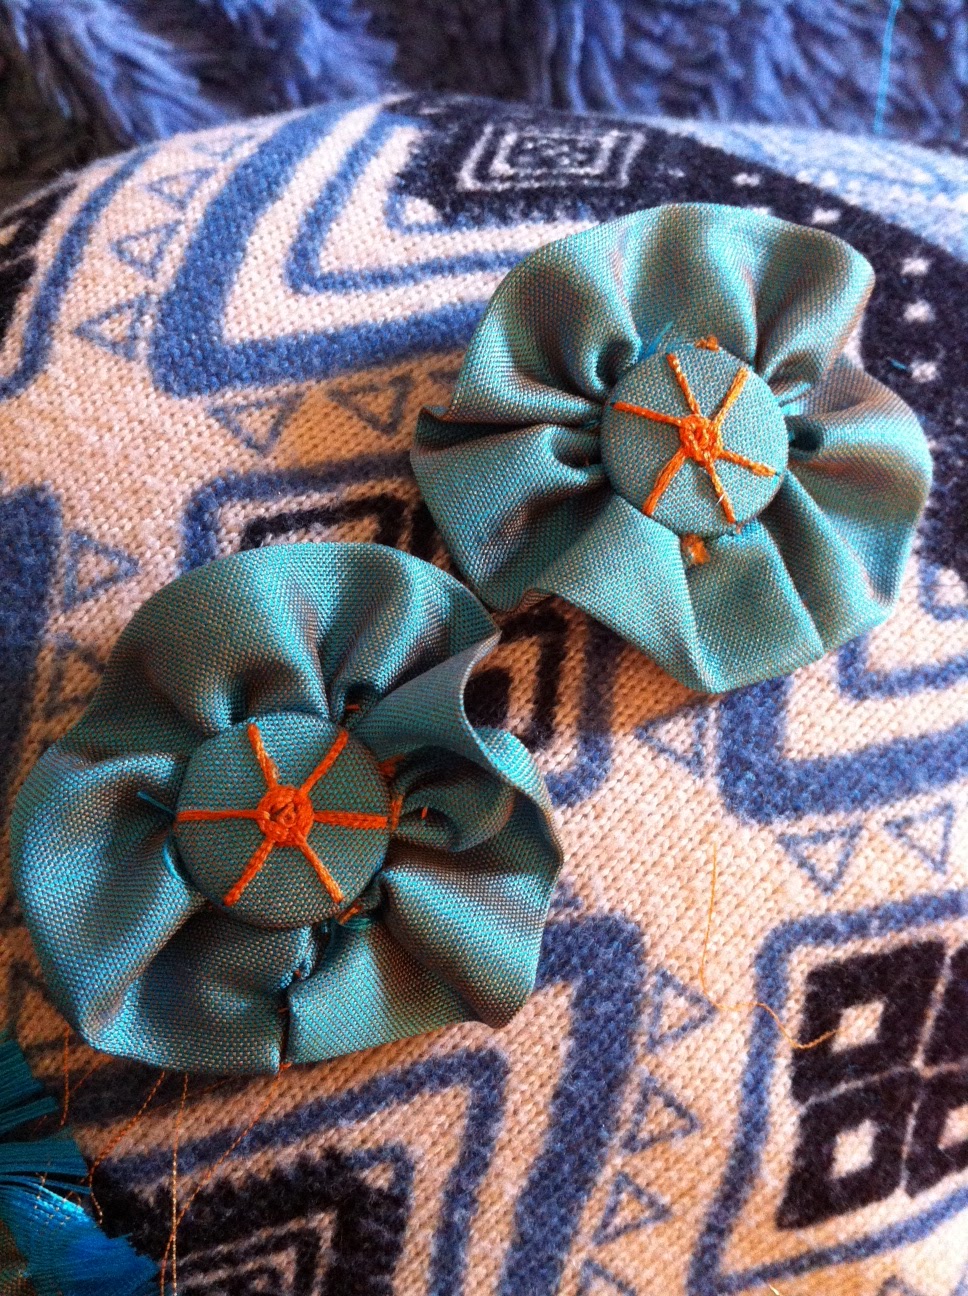
This is what I used to make the 'star' of sorts.  When I had made the star, I began weaving the thread on top of one star point then under the next one to make a spider web effect. I went around the star about 3-4 times before I secured the thread behind the button.  Voila!


Next, I took a 6" piece of fabric 2.5" inches long (my buttons were around 1/2" in diameter).  I folded this piece in half length wise and sewed the two ends together so that they were invisible.


I made basting stitches around the raw edge.  Then I pulled them up so they were a little circle.  I used an invisible stitch to attach this to the button:


And there you have it!  A rosette button for your gown or wrapper!


Photos of the blue/gold gown to come!

Sunday, April 23, 2017

Gold Shot Blue Gown Progress

The Land of the Forgotten... I do not know exactly where all these started projects go when I hit a brick wall and throw them in the closet in a fit of anger.  It seems when I finally get inspiration for these projects, I am unable to find them for several days and I turn the house inside out looking for them.  Then, as if by magic, they appear in the exact spot I remember throwing them so long ago, despite the fact that I had searched there many times.

This is the story of the gold shot blue silk I started so many months ago.  When I bought the silk, I expected a blue shot brown and had a perfect inspiration image for the dress that I wanted to copy nearly exactly.


It was perfect!  Brown and blue, with fringe, just how I imagined.  When I got the fabric, I got right to work.  I cut and made the skirt, then started cutting the bodice.  It wasn't until I started playing with the fringe that I realized something was off.  I had been sent the wrong fabric!  This wasn't blue shot brown; it was a gold/orange shot with blue.  And when I say gold/orange, I really mean bright Halloween orange.  Not something I would use as fringe.  There went all my ideas.  So into the Land of the Forgotten it went.

However, yesterday, looking for a dress at a museum, I found something that would work.


While the fabric is not similar at all, I do believe that I have found the perfect trim inspiration for the gold shot blue gown.  Thread covered buttons with rosettes!  I'm thinking about putting them all down the front of the dress.  I'm also considering putting strips of black velvet on the skirt and bodice as well.

Here is my idea for the buttons:


I'm thinking self-fabric then using the orange for the design.  It should pull it in nicely without using too much of the Halloween orange.  My plan is to wear it to Liendo in May.

Monday, April 3, 2017

Lilac Day Bodice and Fichu

I went down to Liendo this past weekend and had a blast.  At the end of the last tour, we had some descendants of the original family (the Groce family) come through to talk to us.  It was so much fun and such a treat to meet members of the family I portray,

Anyway, for once in my life I got myself together and actually had my projects put together a week BEFORE an event.  The poor ladies I work with are so used to hearing "Yeah, I finished it at midnight last night" when they comment on my dresses.  I finished a net fichu I had been working on (got that lace from www.cottonlace.com-wonderful guy to work with, by the way) and fixed up the lilac day bodice to wear.  Eventually I want to get some more Chantilly and decorate the bodice with it but I used the fichu for now.  I took the time to actually fix my old bodice pattern that I had created years ago so it fits so much better.  The neckline is actually at my neck and not super wide.  I fixed the creasing issues that came with my base being too long in the front.  Unfortunately, I didn't compensate with the darts and used my normal dart formula without remembering I fixed the pattern.  I had to cut out the darts at Liendo (with the dress half on) just to get the dress to fit.  I marked where my new darts should go while I had the bodice on and so it should be super easy to fix.  They just went up about an inch too high (the amount of fabric I took off at the waist) and I couldn't get it to fit over my bust.  Luckily, I had the fichu to cover the funky looking darts.

Anyway, I'm really happy with the fit of the new bodice, regardless of the fixable dart issue.  I'll have to measure where I have it pinned and memorize my new dart measurements before I embark on any new outfits.

This was the first time I got to wear the gown with the Chantilly lace on it which was both fun and terrifying.  I was worried that I might accidentally tear the lace somehow.  Luckily, I've worked at the house long enough to know my way around and which pieces of furniture to avoid (like the Louis XVI cabinet that has metal peeling off) so I didn't have a problem.  I might only wear this dress at Liendo to keep the lace safe.


The fichu was pinned but I had already started undressing when I realized that I hadn't gotten pictures yet so I hastily put undersleeves and jewelry back on and left the brooch off the fichu.  The fichu is an original pattern (I believe from 1869).  I used some cotton net I had and trimmed it with cotton lace from www.cottonlace.com.  The back edging is a 1/8" black velvet ribbon.  I think I'll have to make more fichus.  It was easy to put together and a nice little hand work project for when I don't feel like getting out the sewing machine.

Of course, I have posted about the lilac silk a couple of times before but this was the first time I got to use the day bodice.  Paula had made it up but the front wasn't fitting me so I cut a new front piece and just attached it to her back and sides.  It works really well.  The sleeves are pagoda, so I'm using it for 1858-1860 impressions only.  I attached my lily of the valley organdy collar and undersleeves (lace bought from www.farmhousefabrics.com).  Since I was using my brooch to pin the fichu down, I made a little velvet necktie for the base of my throat.

I really like how my hair turned out this time.  I made a bun in the middle of my hair, pinned in fake braids at my side, and simply pulled over a bit of my natural hair to cover where I pinned in the fake hair.  Then I put on my little pearl hair comb and covered it with a hair net.  I got lots of compliments on it and I never get compliments on my hairstyling abilities.

All in all, it was a busy month, which is nice.  I enjoy being able to talk to people.  We had lots of docents so I helped out when people were downstairs but then went into the music room and played the piano when everyone was upstairs.  I enjoy getting to play on a real piano for a change (all I have at my house is a keyboard) and to play on an original is a truly wonderful experience.

I think I might fix up the periwinkle blue 1850's skirt next and make a bodice to go with it.  Or I might just wear the lilac again with the evening bodice next month.  I haven't decided yet.