Well, actually, it's a mini stripe that is black and pink then shot with blue and then embroidered with black and blue dots, but I still call it the cotton candy dress.
This dress didn't need so much fixing as it did completing. The skirt was done (and done well-watch pocket, skirt lifters, and everything) but the one time I wore it, I wore it with a black wool basque. I was doing pre-hoop for that event, but the skirt can be worn with either a hoop or multitudes of petticoats. I never got around to cutting or stitching the bodice until now.
I felt like I still had plenty of fabric to work with. I knew I wanted a low body basque, with a pelerine and removable pagoda sleeves. That would make the gown very versatile and appropriately 1850s. I didn't have an exact original in mind at the time, just a general idea. I wanted something that could serve me in a variety of different events and times of day. Versatile looks were common in the 1850s!
Completely by accident, I came along the following gown while looking for something unrelated.
 |
| Gown sold on Augsta Auctions. This is the day look. |
 |
| Same gown, with the lower sleeves and pelerine removed. Cute evening look! |
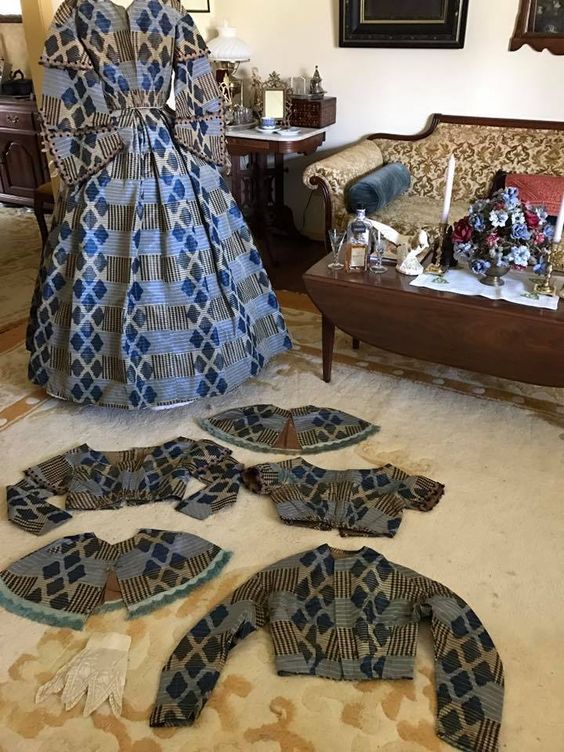 |
| Collection of Heather Hook. blue warp-printed silk dress with two day bodices, two evening bodices, and two pelerines. |
 |
| Musée Galliera de la Mode de la Ville de Paris, 1860s. Evening/dinner look. |
 |
| Same as above, with a pelerine. |
 |
| Sold on Ebay. I believe the lower sleeves are removable as well. |
 |
| Villa Carlotta Museum. |
 |
| Sold on Antique dress. Evening look. |
 |
| Same dress with pelerine added and lower sleeves removed. |
Completely by accident, I came along the following gown while looking for something unrelated.
 |
| Metropolitan Museum of Art, 1856-1857 |
I liked the fringe, the basque, and the pelerine. The design was decided. It was then time to search for fringe-and a lot of it.
That was a bit more difficult than I thought at first. Modern fringes do not mimic period trims well and finding old stock with enough yardage can be tough. Generally I would fringe some of the fabric itself but with the little embroidered dots, I felt that fringing the fabric would be difficult.
I finally found a fringe that workable-with lots of yardage. It probably isn't antique, but it is old stock. In fact, the design on top of the fringe is remarkably similar to the original above.

The only thing I didn't quite care for was the super thick fringe-usually fringe was fine. But with little searching, I did find a few examples of thicker fringe so I felt like my fringe would work.
 |
| Metropolitan Museum of Art, 1845 |
Out of curiosity, I did a burn test on the fringe. It's most likely a silk/rayon blend. It definitely smelled of burning hair which says silk but it burned more like rayon than silk itself. It didn't melt. With those results, I felt comfortable using the fringe on a period reconstruction.
Although it looks a little odd on the bodice to our eyes, the fringe is the exact shade of blue used in the shot silk. I've seen several originals (particularly in the 1840s and early 1850s) that used the weft color (or what seems to be the weft color) as a trim or accessory color. Here are a few examples:
With trim picked out and on its way from France, it was time to cut all the pieces. I did go with a low body and used an original 1850s Godey's pattern for the upper sleeves. I then cut a pelerine (I tried doing a zig zag one like the original but my brain wasn't wanting to recreate those angles so I went with a plain one instead) and some lower sleeves. I also cut a set of bretelles, or braces, for the evening bodice to spice it up a bit. Then I got to sewing.
When the fringe came, I set all the trim on by hand. I added a little black velvet ribbon to the bretelles to set them off where I didn't want fringe. Then it was time to decide what to do with the waistline of the bretelles. Original fashion plates show a variety of treatment-from being left plain to what look like little rosettes.
I made a simple pleated rosette for both the back and the front. The bretelles were stitched together with the rosettes and the whole thing simply slips over my head.

The only other thing to do was to add the accessories. I chose an already completed collar/undersleeves/handkerchief set made from vintage whitework.

Then a tucker needed to be made. Since the upper sleeves for evening were so open, I also made some white silk taffeta puff undersleeves to wear. These, along with the tucker, will be tucked in the dress's pocket until put to use.

The whole ensemble turned out lovely!


Enjoy!
Although it looks a little odd on the bodice to our eyes, the fringe is the exact shade of blue used in the shot silk. I've seen several originals (particularly in the 1840s and early 1850s) that used the weft color (or what seems to be the weft color) as a trim or accessory color. Here are a few examples:
 |
| Meg Andrews Auction Site |
 |
| Unknown painting |
 |
| Whitaker Auction |
 |
| Unknown collection. Brown/red shot with green and trimmed with green velvet. |
With trim picked out and on its way from France, it was time to cut all the pieces. I did go with a low body and used an original 1850s Godey's pattern for the upper sleeves. I then cut a pelerine (I tried doing a zig zag one like the original but my brain wasn't wanting to recreate those angles so I went with a plain one instead) and some lower sleeves. I also cut a set of bretelles, or braces, for the evening bodice to spice it up a bit. Then I got to sewing.
When the fringe came, I set all the trim on by hand. I added a little black velvet ribbon to the bretelles to set them off where I didn't want fringe. Then it was time to decide what to do with the waistline of the bretelles. Original fashion plates show a variety of treatment-from being left plain to what look like little rosettes.
 |
| Unknown magazine, probably 1863-1865 |
 |
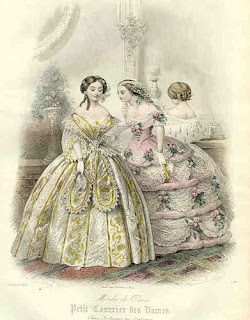
| Magasin des Demoiselles, 1856 |

 |
| Les Modes Parisiennes, 1854 |

The only other thing to do was to add the accessories. I chose an already completed collar/undersleeves/handkerchief set made from vintage whitework.

Then a tucker needed to be made. Since the upper sleeves for evening were so open, I also made some white silk taffeta puff undersleeves to wear. These, along with the tucker, will be tucked in the dress's pocket until put to use.

The whole ensemble turned out lovely!


Enjoy!
No comments:
Post a Comment