Monday, December 21, 2020

Recreating an 1830s Watercolor Box and Portfolio

 This is something I definitely never thought I'd be making as I've never was into painting or drawing.  I received very little instruction in these mediums and they never particularly appealed to me.  But as I am striving to educate myself to the extend of a highly educated woman in the 19th century (due to living history personas' education levels-I have to be able to pass as one of them while in character!  It's not like living historians get a script!), art was on my list of things to learn.  As such, I needed a pretty little box to store art supplies.  A short trip down research lane landed me with several options.
Hygra.com, 1829-1830
This one is especially neat as the artist's paintings
are still with the set!

Hygra.com, 1830-1840

Hygra.com, 1799-1816

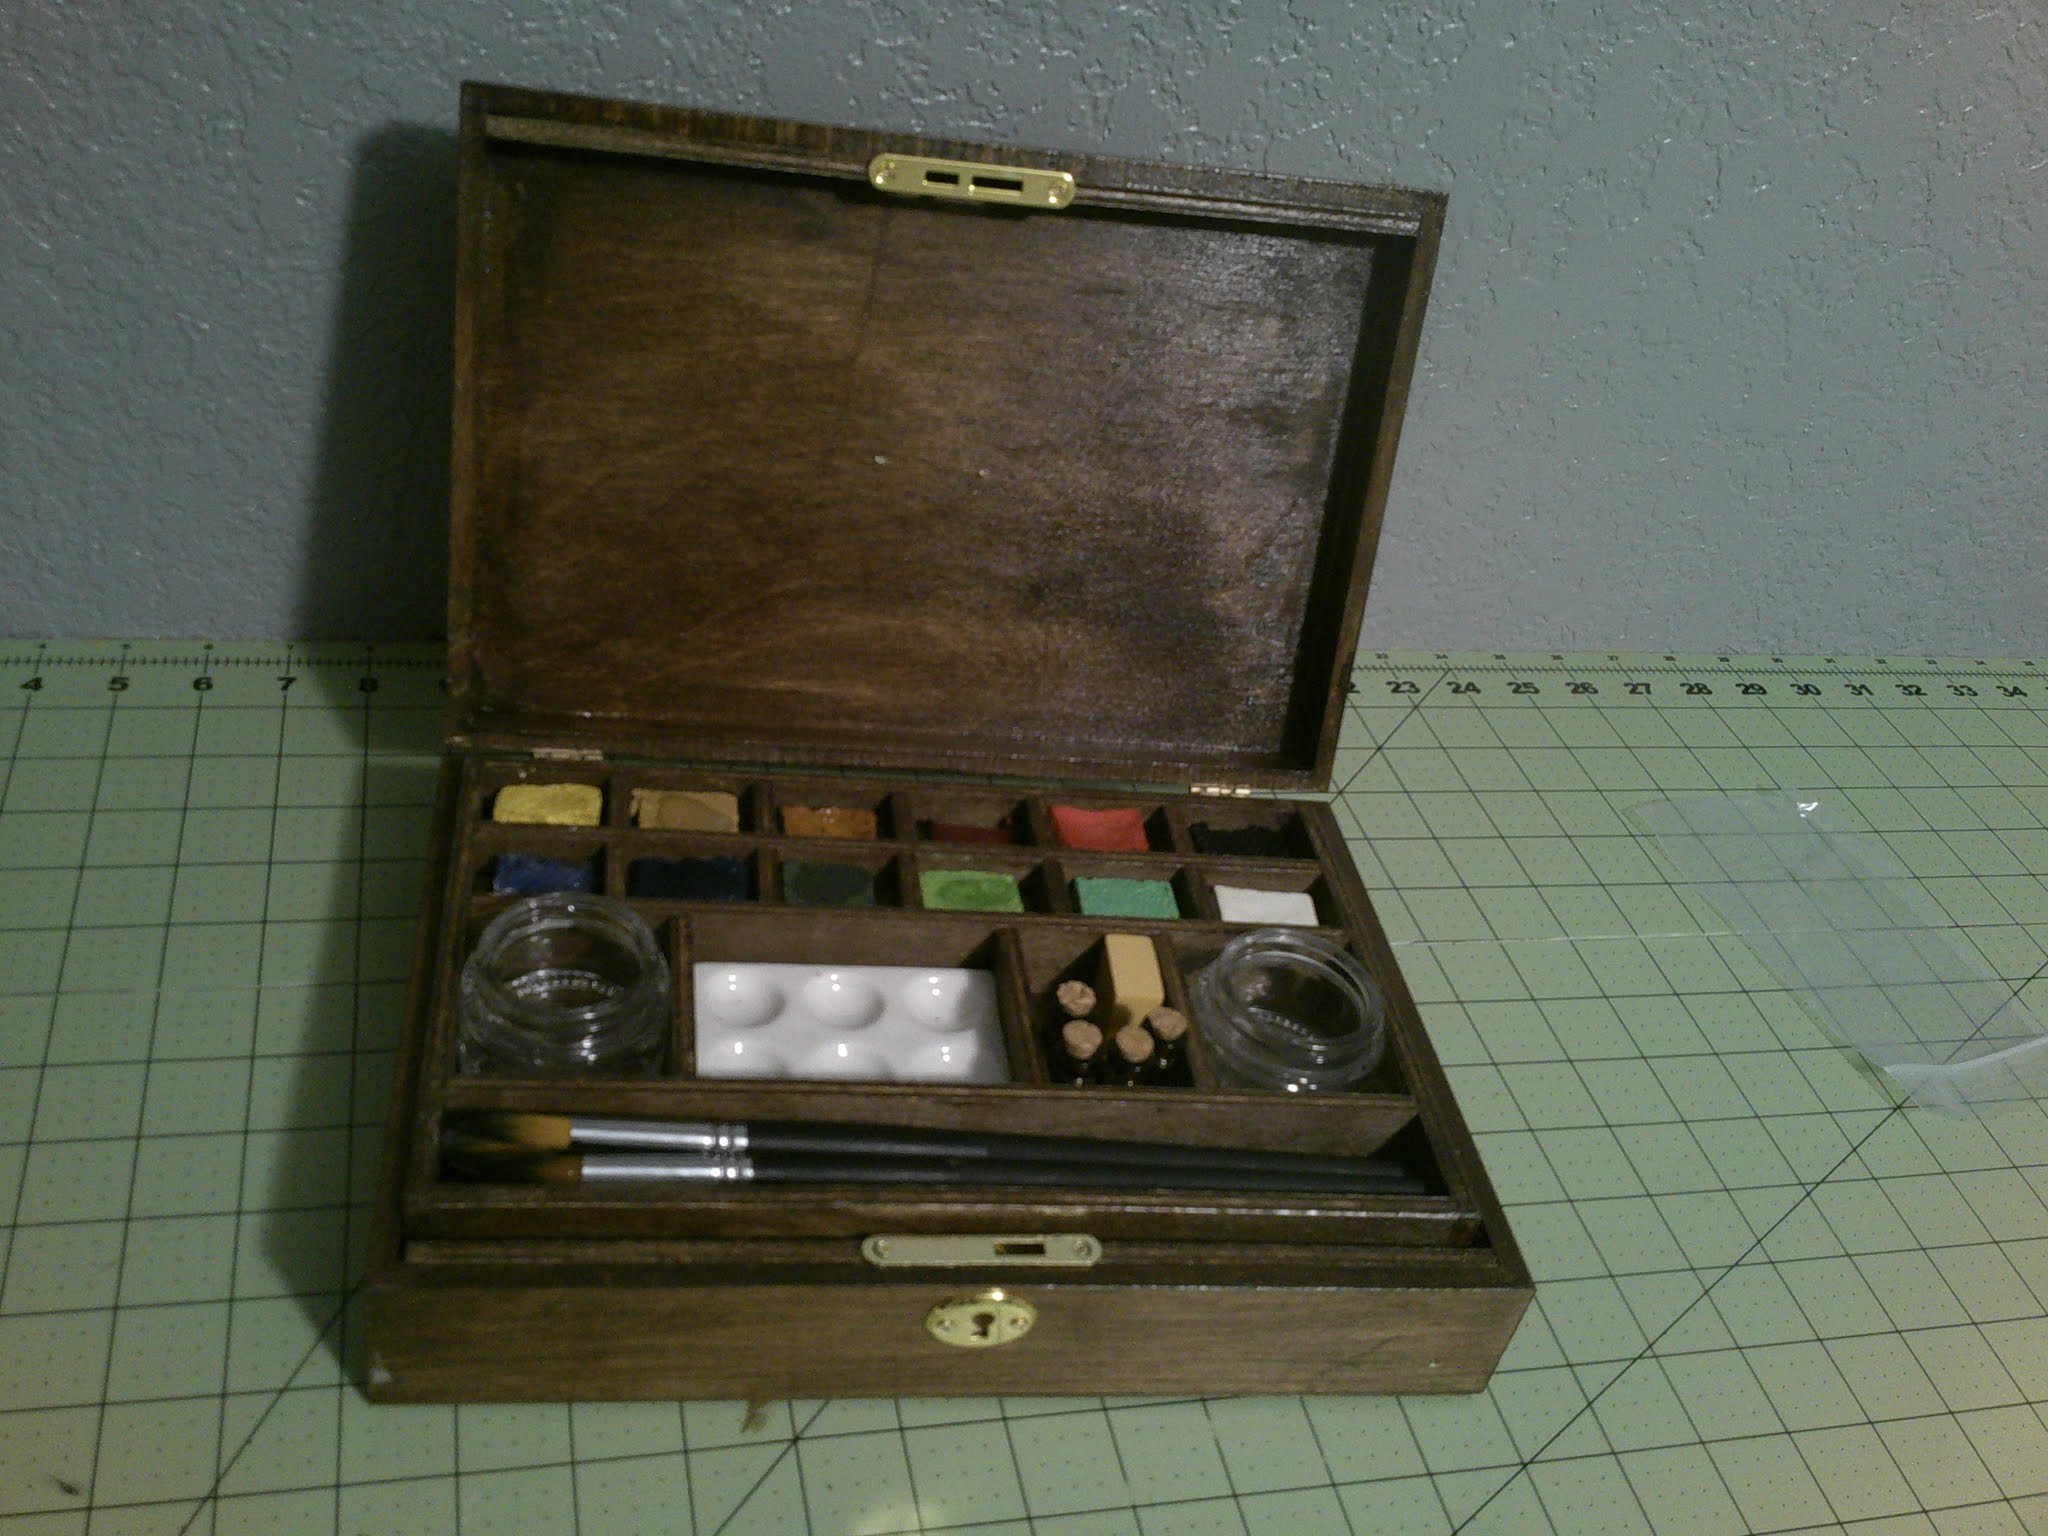
Aren't they cute?  I opted to make mine look more like the last one.  I bought a simple walnut box off Amazon, a little smaller than the originals, but the same proportions. It doesn't have a drawer so I had to build a tray with extra wood.  I also bought the locking system and key from Amazon.  The stain and sealer were left over from another project.  It turned out cute!

For the interior, I chose two glass cups that I already had, some decent sable hair brushes (I made sure they had wood handles and I ended up painting over the company name on the handle to give it more of a period feel without the modern company name on them), various erasers, and a few phials to put ink into.  I also ordered another bone pen and a set of nibs as well as a mixing tray (sold on Ebay as a dental tray) and some charcoal sticks.  I am still in the market for a flat porcelain mixing tray.  The only ones on the market are wood or plastic!

Then it was time for the paints.  Here are the receipts I used.

The watercolor base is 1 cup HOT water, 1/2 cup gum arabic, and 1/4 cup honey.  1/2 teaspoon of glycerin can be added to reduce cracking.  Mix until the gum arabic is completely dissolved (this can take about 15-20 minutes or longer).

The basic 'recipe' for the pigments that fit into my tray consists of 2 spoonfuls of watercolor base (called 'mix' in the recipes below) and 3 spoonfuls of pigment.

1. 2 tsp mix + 3 tsp chalk
2. 2 tsp mix + 2 tsp ginger + 1/2 tsp chalk
3. 2 tsp mix + 2 tsp brilliant yellow + 1 tsp chalk (this came out too light-I'd suggest going all 3 tsp with the yellow)
4. 2 tsp mix + 3 tsp orange ochre
5. 2 tsp mix + 2 tsp narcoat mica powder + 1 tsp chalk
6. 2 tsp mix + 3 tsp raw sienna
7. 2 tsp mix + 1/2 tsp acid dye tobacco leaf + 1 drop vinegar + 1 1/2 tsp chalk
8. 2 tsp mix + 2 tsp violet ochre + 3/4 tsp chalk
9. 2 tsp mix + 1 tsp smoked paprika + 1 tsp chalk
10. 2 tsp mix + 1 tsp acid dye cayenne red + ¼ tsp vinegar + 2 tsp chalk
11. 2 tsp mix + 1/4 tsp acid dye cabernet + 2 tsp chalk
12. 2 tsp mix + 1 tsp shine red mica + 1 tsp chalk
13. 2 tsp mix + 3 tsp cochineal + 1/2 tsp vinegar (this was before lake pigment, just using ground up bugs)
14. 2 tsp mix + 1/2 tsp acid dye sour apple + 1/2 tsp vinegar + 3 tsp chalk
15. 2 tsp mix + 1/4 tsp acid dye moss green + 1/4 tsp vinegar + 3 tsp chalk
16. 2 tsp mix + 1/4 tsp fiber dye granny apple + 1/8 tsp salt + 2 tsp chalk
17. 2 tsp mix + 1 tsp dark green mica + 1 tsp apple green mica + 1 tsp chalk
18. 2 tsp mix + 1 tsp terre verde + 1 tsp chalk
19. 2 tsp mix + 1/4 tsp acid dye wedgewood blue + 2 tsp chalk
20. 2 tsp mix + 1/4 tsp acid dye peacock blue + 2 tsp chalk
21. 2 tsp mix + 1 tsp French turquoise + 2 tsp chalk
22. 2 tsp mix + 1 tsp cobalt purple mica + 2 tsp chalk
23. 2 tsp mix + 1 stick charcoal
24. 2 tsp mix + 1/8 tsp indigo + 2 tsp chalk

After mixing them into the silicone tray, I put them to dry.  You can do this by air drying (avoid sunlight) or if you're impatient like me, in the oven.  I stuck mine in at around 150 or 200 degrees F.  I left mine in the oven overnight to dry and they turned out well.  Don't put them any higher than 200 as I tried 250 and my paints turned out holey and airy, and misshapen/burnt when I put them at 250 for 2 hours.  Lower for longer is better.  Here is the color key chart for how these recipes turned out:


After this first attempt, I tried making lake pigments, which is just taking a liquid dye and reducing it to powder form using alum and washing soda (which is one way to do it).  I made lots of lake pigments-including from natural things such as cochineal (which was suppose to yield a red but I ended up with purple), beetroot (an ugly gray color if you can believe it), and cabbage (blue, green, or purple depending on how much alum I added to the mix).  I also used the Dharma trading dyes and make lake pigments but I would like to continue to experiment with this.  I only ended up using one of my Dharma lake pigment paint blocks in my final box as I managed to burn most of them on 250 degrees F.

For my final 12 blocks, here is the color template of the colors: 


From left to right, here are the recipes.

1. 2 tsp mix + 2 tsp brilliant yellow + 1 tsp chalk
2. 2 tsp mix + 3/4 tsp acid dye tobacco leaf + 1 drop vinegar + 1 1/2 tsp chalk
3. 2 tsp mix + 3 tsp orange ochre
4. 2 tsp mix + 3 tsp raw sienna
5. 2 tsp mix + 3 tsp red mica powder
6. 2 tsp mix + 1 stick charcoal (I didn't grind up the charcoal very well so it's lighter than the first batch)
7. 2 tsp mix + 3 tsp lake pigment made from Dharma's acid dye wedgewood blue
8. 2 tsp mix + 1/2 tsp acid dye peacock blue + 2 tsp chalk
9. 2 tsp mix + 1 tsp dark green mica + 1 tsp apple green mica + 1 tsp chalk
10. 2 tsp mix + 1/4 tsp fiber dye granny apple + 1/8 tsp salt + 2 tsp chalk
11.  2 tsp mix + 3 tsp terre verde

In addition to the box, I also made a portfolio to carry around my finished pieces and extra papers.  It is made with book board covered in leather on the outside and marbled paper on the inside.  I glued it all together with PVA bookbinding glue.  Then drilled holes to insert a lovely silk ribbon.  You see these types of portfolios a lot in paintings and fashion plates being used as an easel to draw upon.

Lady's Magazine, July 1830

"Portrait of the McEven Sisters" by Thomas Sully

Marie-Adelaide Durieux

Mode Parisiennes

Unknown

Unknown

Costume Parisian, 1816

Here is mine:


And the finished watercolor box:


Enjoy!

Monday, December 14, 2020

1830s Corset

 The last installment of the 1830s underpinnings!  Now I can finally start working on dresses.

I made my mock up of this pattern last year in December 2019.  I machine stitched it because I always knew it would be replaced by a better version eventually.  I didn't like how the bust fit, nor the tie on shoulder straps, not to mention I had to take a few big tucks in at the back to make it fit me and those were rather annoying.  Thankfully, this, my final version, has none of these issues.

I made this corset almost entirely out of scraps and bits left over from other projects so it didn't cost much at all!  I used white cotton sateen for the fabric, copious amounts of sugar'n cream yarn for the cording, lots of German plastic whalebone boning, a bit of metal boning for the center back, some metal grommets, and some silk ribbon.  The only things I had to purchase were a wooden busk and some lacing string.

My base is the Laughing Moon romantic corset pattern, view A.  The pattern itself fits me very well with very little alteration, although I did have to go down a few sizes to keep my corset from meeting in the back.  After cutting out the basic pattern, it was time to go back to originals to see how I could improve on the basic Laughing Moon pattern.

To make the bust fit better than the mock up (which falls down constantly despite the extra boning put in), I decided to cord the entire gusset area just like this original from the MET.
Another way I combatted the falling bust issue is to lengthen the boning and add a bit more.  This original shows a more heavily boned corset, especially throughout the bust.  I like how the boning goes down to the waist.  I didn't add quite so much, but I did lengthen the boning pieces from the pattern's suggestion.

Metropolitan Museum of Art, 1833

Most originals do show the entire set of stays backstitched, but there are originals that show the exterior stitching being done with a running stitch.  I copied those originals purely for my sanity throughout this project.

Metropolitan Museum of Art, 1815-1825

For decoration, I knew it needed to be fancy.  Sarah, after all, would be able to afford the best.  I considered heavy embroidery but decided against it-again citing my own sanity.  I did find a rather simple embroidery design using a herringbone stitch pattern that I decided to use instead. I, however, opted for a feather stitch instead of the herringbone pattern.

Metropolitan Museum of Art, 1830s

Instead, my eventual design outside of embroidery came out to be a rather hodge-podge of originals.  The top front (basically to the end of the gussets) is based on this original.  I only added cording to help support the bust.

Unknown collection

Lots of boning going down to the waist, very little embroidery (although I added some around the gussets as in the previous original).

From gussets down, I copied this original.

V&A Museum, 1825-1835

And another view of the same corset, this time from the side.  Look at all that boning!  This will be a very supportive corset!


The only thing I really changed was to do the embroidery seen above instead of the wavy thing going on in this corset.  I also added embroidery to the hip gussets to match the bust gussets.  The bones also received a fair bit of flossing on the top and bottom to hold them in place.


This corset closes with a spiral lacing as opposed to my typical 'bunny ears' style.  I considered fan lacing but decided to leave that for another day.

With all the fitting issues fixed and the added support in the back and bust, I think this corset turned out lovely!  Now we can start working on dresses.


Enjoy!


Monday, December 7, 2020

An 1850s Blue Checked Gown

This is another gown from the costume closet that needed some little updates.  I made this gown about 2 years ago, and although it was done very well, there was just a few things that needed to be done.

The fabric is a lovely large scale blue checked silk taffeta fabric I bought at Fabric Mart Fabrics at one of their $8/yard or $12/yard sales.  I can't remember exactly how much I paid for it.


It very much reminds me of the fabric this beautiful lady is wearing:

Unknown source

The basic design of the day dress was based off that photograph and also this original:

Ebay

First of all, the day bodice needed boning put in.  I also added some cute little glass buttons as decoration (more on the buttons later).  Afterwards, the only thing to do was to attach a real collar and undersleeves.  This set I hand embroidered from an 1853 Godey's Lady's Book pattern.


The Book only had the collar pattern so I modified the same design for the undersleeves.  I also have plans for a matching handkerchief but that is still getting embroidered.  For the undersleeves, I chose a design that seems to be quite popular among surviving originals.

Ebay

Museum of Fine Arts, Boston

I think they turned out cute!


The trim idea I got from a few different originals.  Now that I have made this dress, I don't think I'll ever put velvet ribbon on top of fringe again, but you do see originals with this treatment so it is by no means incorrect.

Metropolitan Museum of Art

Ebay


The main part of this project was making an evening bodice.  The design was a somewhat simplified version of these two originals:

Victoria & Albert Museum

Ebay

The button idea came from a multitude of sources, but here is a dress with lace surrounded buttons.

Metropolitan Museum of Art

Overall, I'm happy with the result!


Enjoy!