Monday, November 2, 2020

More 1850s/1860s Evening Head-dresses

 Yes, more of them  Four more, to be exact.  Mostly because, why not?

First up, I copied one worn by Queen Victoria in 1851.


I used millinery wire to build a base which was then covered in a brown velvet ribbon.  That was covered by a royal blue silk satin ribbon that I box pleated.  I added a bit of Chantilly lace to the back and put a silk flower on one side.  My flowers were bigger than Queen Victoria's so I only used one plus a few leaves instead of the three the Queen wore.


The next was a simple floral headdress.  I used just two floral stems from Timely Tresses and attached them by wrapping them in silk ribbon.  Super simple!  And really cute.


It was based off several originals, like this one:


Next up, I made another wire based headdress.  This one was based off this original:


I used apple green velvet ribbon and black Chantilly lace instead of the red velvet and blonde lace the original used.


And finally, I decided to remake a headdress that I made many years ago.  It was originally based off this engraving from Godey's Lady's Book, 1861.


Godey's also published four more headdresses that year.


I took off the flowers that were on the headdress, added wire to the top, and recovered it in black silk taffeta.  I put pearls on front and ostrich feathers in back.  I think it turned out cute!  I especially love that it is totally neutral.


Enjoy!

Monday, October 26, 2020

Visiting Cards and Cases in the 1830s

 Being that I hope to start attending 1830s events soon, I decided to work on a few practical wardrobe pieces for interacting with the public.  A card case for Sarah's (my character) visiting cards as well as my own business cards was first on the list.

The Workwoman's Guide has directions for a card case... and I did try that at first.  It didn't turn out too well.  So I decided to go back to the drawing board.  I search Godey's Lady's Book (Then called simply "The Lady's Book") and Peterson's Magazine hoping to find directions for making a card case.  No such luck, although from 1830-1835 I did find many references in stories to cards and card cases used by both men and women.  So they were definitely being used.

Although finding directions for making card cases was difficult, I did manage to find pictures of originals.  I am especially fond of the following ivory/bone carved ones.

Philadelphia Museum of Art, 1830-1840

Philadelphia Museum of Art, 1830-1840

Unfortunately, no similar looking cases were for sale in my budget.

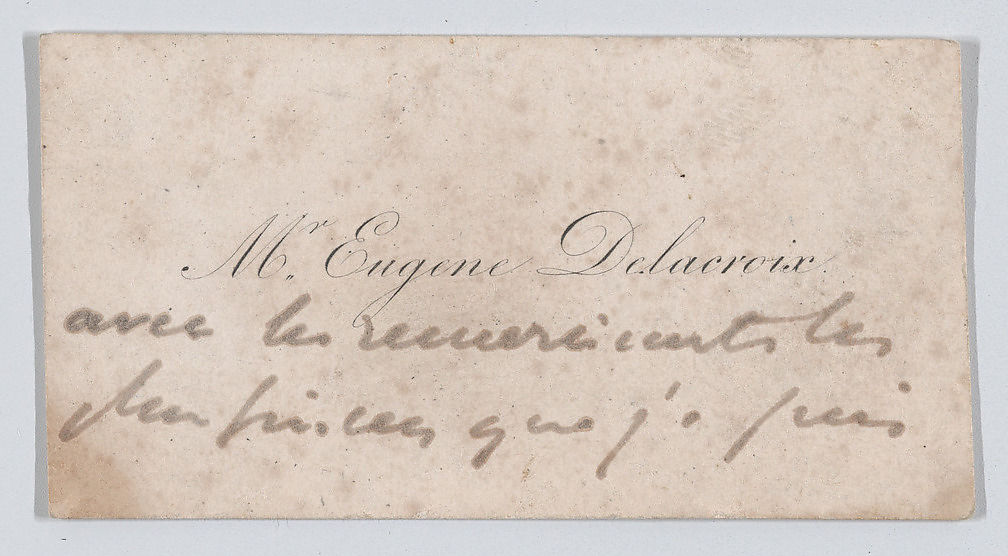
I decided to take a break from card cases and focus on the actual cards.  I think mine turned out quite well, especially when compared to the original.  I used Mrs. William H. Wharton for Sarah's cards as that would have been most common at the time.


Here's an original card.  The date is unknown (1822-1863) as cards don't change a whole lot during this time frame.

Metropolitan Museum of Art

Supposedly, the visiting card custom started in England before it moved to the States.  I'm not sure of the time frame on that but cards were definitely being used in America by the 1830s.  In 1832, Miss Emeline Parker from Massachusetts had her portrait done with visiting card in hand.

Metropolitan Museum of Art

I can't find record of card cases being sold or card engraving services being offered in Texas pre-1836 but advertisements aren't as thorough in the early years as they become mid-1840s and beyond so that does not mean they weren't offered.  Sarah, being schooled in Nashville and New York City would have certainly been familiar with the custom and probably had her own cards and case.  As all Texans were transplants from other states (Texas only started being colonized by white people in 1821), it is likely that they brought this custom over with them.

As far as beaded card cases go, I had a hard time finding originals.  But finding original card cases that aren't bone or metal is difficult as they are often labeled as something else (cigar case, pocket book, purse, coin purse, etc.).  I found a few originals that had a similar look as what I was going for.

Unknown source, 1830-1850

Metropolitan Museum of Art, 1800-1830

FIDM Museum, 1785 (with sequins, not beads)

For my case, I decided to do the beadwork on perforated paper, although the originals appear to have done the embroidery directly on the silk fabric.  This was mostly so I could have holes to get my stitches even.  I found when the case was done, it looks remarkably similar to the MET beaded example above and one can hardly tell the paper is there.

For my design, I picked a vine looking border done in green and blue with a center featuring a yellow rose and several little pink flowers. For the back, I decided to go with Sarah's initials done in pink.  Since the initials were in pink, I opted to use a scrap of yellow silk for the interior of the case to make the pink stand out more.  I used a bit of teal ribbon to bind the top edge of the pockets as well.

My finished embroidery pieces ended up about 4" by 2.5" with the finished case ending up being about 3" tall by the time you add in the bit of yellow silk on top.


Enjoy!

Monday, October 19, 2020

Recreating an 1850s Silk Dress

 So remember a few months ago when I did a post about a new original I added to the collection?  And I said I would recreate it?  Well, I finally had the time to sit down and do it.


Since I already recreated a black silk dress, I decided to do a different color than the original for this gown.  Since the original gown was more of a tissue taffeta than a normal taffeta, that limited my color choices somewhat.  Two of my three other 1850s gowns were blue so that ruled that out-I decided that a little variety was in order.  Purple, I felt, was too close to blue and since the cotton candy silk already had some pink, I ruled that color out as well.  There were some really pretty shot taffetas and a few greens I considered, but I ended up going with red.


The dress was easy to make up-gauged skirt (to which I added a watch pocket), skirt pocket, and facing done in polished cotton.  I did attempt hem braid for the first time-I think I may go with a slightly wider wool braid next time.


The bodice features absolutely no boning, but instead is gathered both in the front and the back-even the lining is gathered.  The bodice closes with hooks and eyes, spaced a rather whopping 1.5" apart.  The bodice also featured a self-fabric waistband that is piped along the bottom (along with the neckline and armscye).  The only real changes I had to make to my normal bodice pattern was to cut it 1.5" shorter to accommodate the waistband and to add width to the back bodice to allow for the gathering.


The sleeves are bishop-not ever my first (or second) choice in sleeves, but I think they turned out nice.  They have a self-fabric cuff that is trimmed with a ruching of self fabric.  The cuffs close with hooks and eyes and I also added some small white linen cuffs.


For the collar, I chose an 1854 Godey's Lady's Book pattern for a crochet collar.  I used size 30 crochet cotton, which in hindsight was still probably a bit thick for what I needed it to do.  I used a crochet hook that is itty bitty but labeled size 7.


I made up the collar mostly similar to the original pattern, making some changes to the leaves to make it lay better.  Here is my version of the pattern, with modern crochet language.
     Chain 180 stitches.
     Row 1: Work a sc in every chain across (180 stitches).
     Row 2: *3 dc, ch 3, miss 3.  Repeat from * across.  You should end on a 3 dc.
     Row 3: *3sc, ch 3, miss 3.  Repeat from * across.  You should end on a 3 sc.
     Row 4: *Sl st on the 1st sc, ch 6, skip 5 stitches.  Repeat from * across.  I think I added a little chain of 3 at the end to make it since it didn't match up perfectly.
     Row 5: *Ch 7, sl st on the center of the loop.  Repeat from * across.
     Row 6: Sl st until you get to the center of the 1st loop, *ch 6, sl st on the center of the next loop.  Repeat from * across.
     Row 7: Sc on every chain, miss every sl st.
     Row 8: Sl st the 1st 6 stitches.  *Ch 9, sl st in same stitch, ch 12, sl st in same stitch, ch 9, sl st in same stitch.  Turn work, work a sc in every ch across, missing the sl st.  Turn work.  Sl st in 1st 3 sc, then attach your leaf to the ground by taking the 4th sc to your right that is on the ground.  Work both stitches as 1 (sc).  Sc on the remaining sc, sl st once you reach the end of the leaf.  Sl st on the next stitch, ch 2, work a sc in the next 10 stitches.  Work a sl st in the 11th stitch.  Repeat from * across. You should end with 6 sc stitches.  On the last stitch, work the 1st point of the last leaf in with the last stitch to attach them.
     Row 9: *Ch 7, sl st in the center of the 2nd point of the leaf, ch 12, sl st in the center of the 1st point of the next leaf.  Repeat from * across.
     Row 10: Sc in every stitch across.
     Row 11: 2 sc, *3ch, sc in the next 3 stitches.  Repeat from * until you get to the big (middle) point of the 1st leaf.  Sl st in the middle stitch, ch 6, sl st back in the same stitch.  Repeat with the 3 ch, sc in the next 3 stitches until you get to the next leaf's middle point.  Repeat across.
     Row 12: Sc in all of the previous sc on the last row but work the chains as such: 1 sl st, 4 sc, 1 sl st.
     Row 13: Sc in 1st stitch, *ch 3, skip 2, sc 1.  Repeat from * across.  When you reach the end, start working up the side of the collar the same way.  I slip stitched across the neckline to do the same on the other side of the collar.

I also made a linen handkerchief to match the cuffs.


The only thing that was left was to make up the pelerine.  I added a bit at the shoulders to give myself some more wiggle room and added a bit more across the fronts as well to make it meet in the front.  Other than that, I made it up exactly as the original.  The pelerine is trimmed in antique silk fringe I found online.


This is the 4th 1850s gown that I have, and I am so happy to add a little variety in color and style to the wardrobe!


Enjoy!